Unleash Your Artistic Potential: A Journey into the Art of Facial Drawing
The allure of capturing the human face has captivated artists for centuries. Whether you’re an aspiring artist or a casual enthusiast, this comprehensive guide will delve into the essential techniques and tips for creating stunning facial portraits. Join us on an artistic adventure as we unlock the secrets of drawing realistic and expressive faces.

Image: pencildrawings2019.blogspot.com
Art, much like life, is a canvas of emotions, stories, and expressions. Portraits, particularly, stand as testaments to our quest for connection and the desire to capture the essence of the human spirit. From the enigmatic smiles to the subtle nuances of a furrowed brow, a well-executed portrait has the power to transcend time and evoke a myriad of emotions within the viewer.
The Basics of Facial Anatomy
Before embarking on our drawing journey, let’s delve into the underlying anatomy of the face. Understanding the structure of the skull, the placement of facial muscles, and the contours of the features will provide a solid foundation for your artistic endeavors. Consider studying anatomical references or consulting with a figure drawing instructor to gain a comprehensive grasp of the human face.
With the groundwork laid, gather your essential art supplies: pencils of varying grades (HB, 2B, 6B), an eraser, a sharpener, and drawing paper. Choose a comfortable workspace and prepare to bring your artistic vision to life.
Step-by-Step Guide to Drawing a Face
- Outline the Basic Shape: Begin by lightly sketching an oval or circle to represent the face’s shape. This will serve as the foundation for building the facial features.
- Define the Features: Using ovals and circles, mark the placement of the eyes, nose, and mouth. Align the eyes horizontally, ensuring they are equidistant from the center and the sides of the face. Position the nose at the intersection of the lower third and upper two-thirds of the face.
- Sketch the Contours: Refine the overall shape of the face by gradually building the contours of the forehead, cheeks, and chin. Observe the subtle curves and angles that define the facial structure.
- Draw the Eyes: Begin by drawing the upper and lower eyelids as curved lines. Add the irises and pupils, taking into account the direction of the gaze. Define the eyelashes for added depth and expression.
- Shape the Nose: Draw a vertical line to represent the bridge of the nose. Add two curved lines on either side to create the nostrils. Depending on the perspective, the shape and size of the nose will vary.
- Outline the Mouth: Sketch the upper and lower lips as two curved lines. Define the corners of the mouth, considering the intended expression, whether it’s a gentle smile, a neutral expression, or something more complex.
- Add Shadows and Highlights: To create depth and realism, introduce shading and highlights. Use darker pencils to emphasize areas such as the creases around the eyes, the nostrils, and the hollows beneath the cheekbones. Add highlights to protruding areas like the bridge of the nose and the forehead.
Expert Tips
- Practice Regularly: Consistent practice is key to honing your drawing skills. Dedicate time each day to sketching facial features and studying different face shapes and expressions.
- Study the Masters: Analyze the works of renowned portraitists to observe their techniques, use of light and shadow, and emotional depth.
- Experiment with Different Pencils: Explore various pencil grades to achieve a range of tones and textures. Harder pencils (such as HB) create lighter lines, while softer pencils (such as 6B) produce darker, more expressive strokes.
- Pay Attention to Details: Subtle details can bring a portrait to life. Observe the texture of hair and skin, the shape of eyebrows, and the wrinkles that convey emotions.
- Use Reference Images: Utilizing reference photographs can provide a valuable guide, helping you capture accurate proportions and expressions.
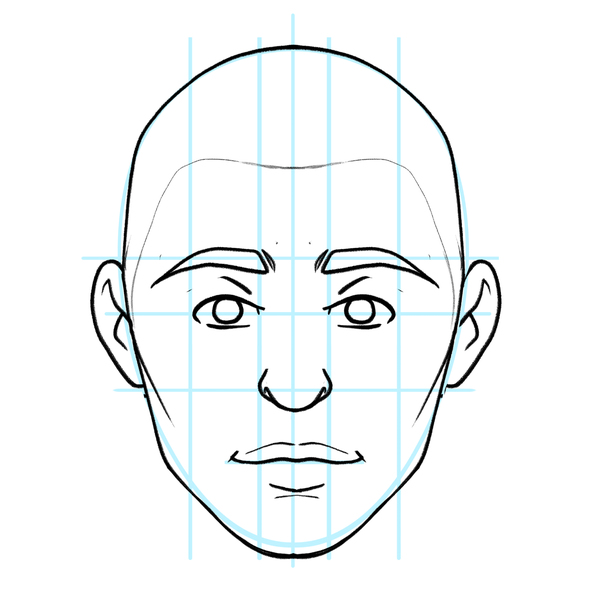
Image: www.animalia-life.club
Frequently Asked Questions
- Q: What type of paper is best for drawing faces?
- A: Smooth, lightly textured paper is ideal, as it allows for precise lines and blending.
- Q: Can I use a ruler to draw the eyes and nose?
- A: It’s generally not recommended to rely on rulers. Freehand drawing encourages a more natural and expressive style.
- Q: How do I avoid smudging my drawings?
- A: Rest your hand on a piece of clean paper or use a blending stump to avoid touching the drawing with your skin.
- Q: Is it possible to learn to draw faces without any artistic background?
- A: Absolutely! With patience, practice, and the guidance provided in this article, anyone can master the art of drawing faces.
How To Draw A Face For Beginners
https://youtube.com/watch?v=X7vOCpGWFP0
Conclusion
Embarking on the journey of drawing faces is an enriching and rewarding experience. By grasping the fundamentals of facial anatomy, applying the step-by-step guide, and incorporating the expert tips outlined above, you can unlock your artistic potential and create stunning portraits. Remember, art is a process of continuous improvement and experimentation. Embrace the joy of drawing, and let your unique artistic voice shine through.
Call to Action: Share your facial drawing creations on social media, using the hashtag #ArtOfFaces. We’d love to see your interpretations and celebrate the beauty of human expression brought to life through art.

/GettyImages-1303637-two-way-mirror-57126b585f9b588cc2ed8a7b-5b8ef296c9e77c0050809a9a.jpg?w=740&resize=740,414&ssl=1 "Unveiling the Illusion – A Comprehensive Guide to Detecting Two-Way Mirrors")


