As a self-proclaimed balloon-aficionado, I often find myself immersed in a world of vibrant inflatables, eager to conquer the art of balloon tying. It’s a skill that elevates ordinary balloons to masterpieces, captivating audiences and creating unforgettable moments.

Image: myyachtguardian.com
The first step towards balloon-tying mastery is understanding the tools that empower us. In this article, we will embark on a comprehensive exploration of a balloon tying tool, unraveling its secrets and unlocking its potential for creating extraordinary balloon displays.
Unveiling the Balloon Tying Tool
A balloon tying tool is an indispensable accessory for any balloon enthusiast, designed to expedite and simplify the tying process. This handy device typically consists of a plastic base with a hook or prongs at one end and a spool of ribbon or string at the other.
Its ergonomic design allows for effortless tying, minimizing wrist strain and frustration. Moreover, it ensures consistency in the size and shape of knots, producing a polished and uniform look for your balloon creations.
Benefits of Using a Balloon Tying Tool
- Expedite balloon tying: Saves time and streamlines the process, allowing you to inflate and tie multiple balloons efficiently.
- Effortless tying: Eliminates wrist fatigue and strain, making balloon tying a comfortable and enjoyable experience.
- Consistency in knots: Produces uniform and secure knots, enhancing the aesthetics and durability of your balloon displays.
Decoding the Art of Balloon Tying with a Tool
Mastering the art of balloon tying with a tool is a skill that unravels with practice. To guide you on this creative adventure, let’s delve into a step-by-step explanation of the technique:
- Measure and Cut Ribbon: Determine the desired length of ribbon for your knot and cut it accordingly. A general rule is to use a ribbon length approximately twice the diameter of the balloon.
- Thread Ribbon through Tool: Pass one end of the ribbon through the hook or prongs of the balloon tying tool and secure it.
- Insert Balloon Neck: Hold the balloon neck firmly and insert it into the tool, positioning the knotting point against the hook or prongs.
- Tie a Simple Knot: Use your other hand to pull the ribbon from the spool and wrap it around the balloon neck once, forming a simple overhand knot.
- Double the Knot: For added security, wrap the ribbon around the balloon neck a second time, forming a double overhand knot.
- Slip Knot Off Hook: Once the knot is secure, gently slide it off the hook or prongs, completing the balloon tying process.
- Use High-Quality Ribbon: Opt for ribbons made of durable materials such as satin or curling ribbon to ensure strong and reliable knots.
- Practice Makes Perfect: As with any skill, practice is key to mastering balloon tying. Dedicate time to practice and experiment with different ribbons and balloon sizes.
- Avoid Over-Tightening: While you want to secure the knot, over-tightening can damage the balloon or make it difficult to inflate later.
-
Q: What size balloon tying tool should I use?
A: The appropriate size of the balloon tying tool depends on the size of the balloons you intend to tie. Opt for a tool with a hook or prongs large enough to accommodate the neck of the balloons. -
Q: Can I use a balloon tying tool to tie other types of balloons, such as latex or Mylar balloons?
A: While balloon tying tools are primarily designed for latex balloons, they can also be used to tie Mylar balloons with a slight adjustment. Secure the Mylar balloon neck in place with a small piece of tape before inserting it into the tool. -
Q: How can I create decorative knots using a balloon tying tool?
A: To create decorative knots, once you have tied a simple or double overhand knot, you can shape the ribbon into loops or curls to enhance their visual appeal. Experiment with different ribbon lengths and knotting techniques to discover unique and eye-catching designs.
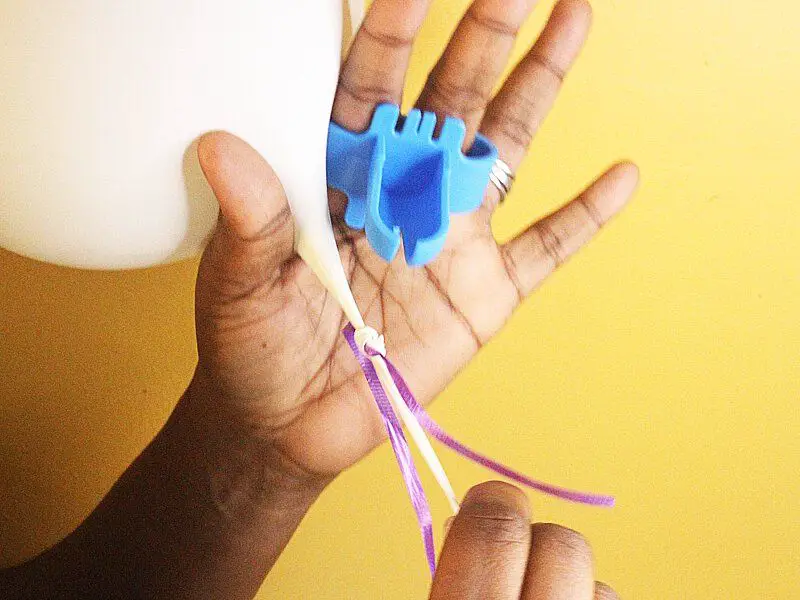
Image: balloonblowout.com
Tips and Expert Advice for Enhanced Balloon Tying
Elevate your balloon tying skills by embracing these expert tips and tricks shared by experienced balloon artists:
Frequently Asked Questions on Balloon Tying Tools and Techniques
To address common queries surrounding balloon tying tools and techniques, let’s explore some frequently asked questions:
How To Use A Balloon Tying Tool
Conclusion: Unleashing the Power of Balloon Tying
Embracing the use of a balloon tying tool empowers you to create professional-looking balloon displays with ease and efficiency. By mastering the techniques outlined in this article, you can unlock the potential of this simple yet versatile tool and transform ordinary balloons into extraordinary works of art.
So, are you ready to embark on this exciting journey of balloon tying? Let your creativity soar and showcase your exceptional creations to the world. Don’t hesitate to experiment, ask questions, and share your awe-inspiring balloon designs with us!


