In the enchanting world of animation, there are few characters as iconic and beloved as Tinkerbell. Her sprightly presence, mischievous nature, and unwavering friendship with Peter Pan have captivated generations of children and adults alike. If you’ve ever desired to bring the magic of Neverland into your own artistic creations, this comprehensive guide will guide you step-by-step in drawing Tinkerbell.

Image: www.drawinghowtodraw.com
Step 1: Crafting the Base Structure
Begin by sketching a circle for Tinkerbell’s head and a slightly larger circle beneath it for her body. Connect these circles with a curved line for the neck. For her wings, draw two curved lines extending from the back of her head, resembling the delicate shape of butterfly wings.
Step 2: Defining the Body
Refine the outline of Tinkerbell’s body by sketching a slight curve inward for the lower torso, creating a bell-shaped silhouette. Sketch two lines extending from the bottom of her body for her legs, with slight curves at the knees.
Step 3: Adding Character to the Face
Bring Tinkerbell to life by defining her facial features. Start by drawing two large almond-shaped eyes, adding dots for pupils and a curved line above each eye for the brow. Sketch a small smile on her face and add a tiny nose just above.
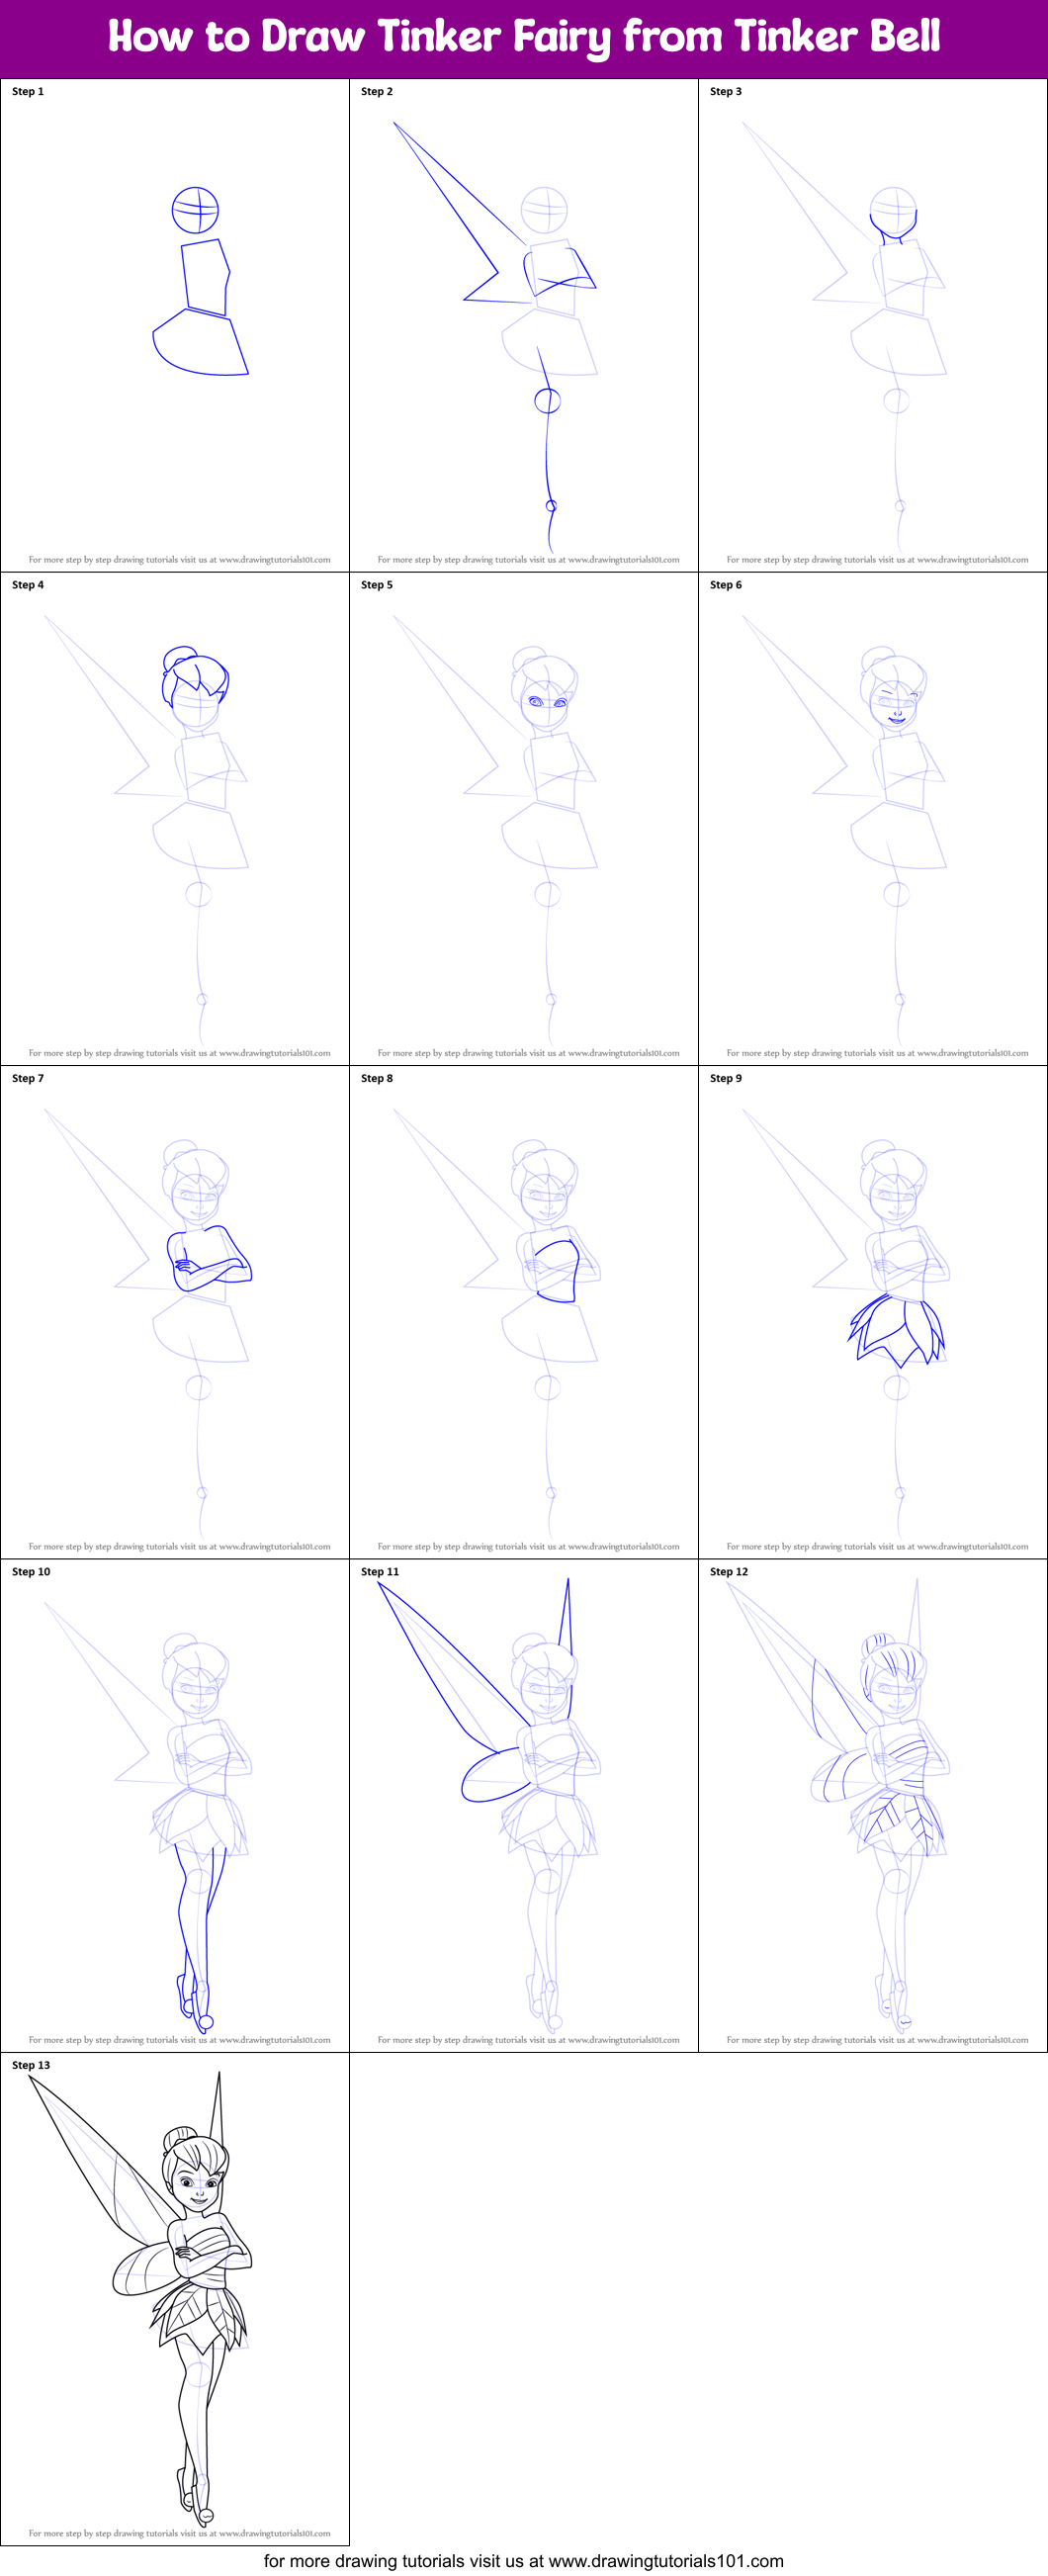
Image: www.aiophotoz.com
Step 4: Shaping the Wings
Breathe life into Tinkerbell’s wings by refining their outlines. Draw a series of curved lines running parallel to the wing’s outer edge, creating the delicate veins and texture of a fairy’s flight. Add a few dots to represent the sparkly fairy dust that accompanies her every movement.
Step 5: Defining the Outfit
Tinkerbell’s iconic dress is as charming as the fairy herself. Sketch a simple rectangle for the dress, with a slight curve at the bottom to mimic the swaying fabric. Add a small bow just above her waistline for a touch of femininity.
Step 6: Final Touches and Details
Complete your masterpiece by adding the finishing details that bring Tinkerbell to life. Draw a messy bun on her head, held in place with a tiny hairband. Add a pair of small, pointed ears and delicate hands at her sides. The key to capturing Tinkerbell’s essence lies in the charming details that bring her personality to the forefront.
Step 7: Bring Color to Your Creation
Once the pencil work is complete, it’s time to add magic to your drawing through color. Give Tinkerbell’s wings a vibrant shade of green, reminiscent of the lush foliage of Neverland. Color her dress in a soft shade of emerald, reflecting the fairy’s connection to nature.
Step 8: Adding Shadow and Depth
Enhance your drawing by adding shadows and highlights to create depth. Use a darker shade of green for the underside of her wings and dress to give the illusion of volume. Add a pink hue to her cheeks and a soft yellow glow to her eyes to bring warmth and vitality.
Step 9: Finalize and Reflect
Complete your drawing with precision, erasing any unnecessary lines and refining the contours. This is the moment where you can add your own unique touch, perhaps by adding a shimmering background or creating a setting that captures the wonder of Tinkerbell’s world.
How Do You Draw Tinkerbell Step By Step
Conclusion
Congratulations! Your enchanting drawing of Tinkerbell now captures the spirit of Neverland. With practice and dedication, you can create countless other magical creatures from your imagination. Remember, the world of art offers endless possibilities for expression and imagination, so don’t be afraid to let your creativity soar. Embrace the magic of the moment, and keep drawing from the heart.


/GettyImages-1303637-two-way-mirror-57126b585f9b588cc2ed8a7b-5b8ef296c9e77c0050809a9a.jpg?w=740&resize=740,414&ssl=1 "Unveiling the Illusion – A Comprehensive Guide to Detecting Two-Way Mirrors")


