Introduction
The ignition coil is a critical component of any internal combustion engine, responsible for converting the 12 volts supplied by the battery into the thousands of volts required to create a spark across the spark plugs. A weak or faulty ignition coil can lead to a host of problems, from hard starting and poor performance to complete engine failure. If you suspect your ignition coil is faulty, checking its resistance with an ohm meter is a quick and easy way to confirm your diagnosis. Here’s a step-by-step guide to help you do just that.
Checking an Ignition Coil with an Ohm Meter
Checking an ignition coil with an ohm meter is a straightforward procedure that can be completed in a few minutes. However, it’s important to take precautions to avoid electrical shock and damage to your vehicle’s electrical system. Always disconnect the negative terminal of the battery before working on the ignition coil.

Image: goodmood-photobooth.com
Materials You’ll Need
- Ohm meter
- Wrenches or socket set
- Safety glasses
- Gloves
Step-by-Step Instructions
- Safety First: Disconnect the negative terminal of the battery. This will prevent electrical shock and damage to the electrical system.
- Locate the Ignition Coil: The ignition coil is typically located on or near the engine. It consists of a cylindrical-shaped body with two terminals on top.
- Prepare the Coil: Remove the bolts or screws that hold the ignition coil in place. Carefully lift the coil out of its mounting bracket, taking care not to damage any wires or connectors.
- Identify the Terminals: The ignition coil has two terminals: the primary terminal and the secondary terminal. The primary terminal is usually connected to a single wire, while the secondary terminal is connected to two or more wires.
- Set Ohm Meter: Set the ohm meter to the lowest resistance setting (typically 200 ohms or less).
- Test Primary Resistance: Touch one probe of the ohm meter to the primary terminal and the other probe to the negative terminal of the battery. The resistance reading should be between 0.5 and 2 ohms.
- Test Secondary Resistance: Touch one probe of the ohm meter to the secondary terminal and the other probe to the negative terminal of the battery. The resistance reading should be between 5,000 and 15,000 ohms.
- Interpret Results: If the resistance readings are within the specified ranges, the ignition coil is functioning properly. If the readings are outside of these ranges, the ignition coil is faulty and needs to be replaced.
Tips
- When testing the primary resistance, make sure to touch the probe directly to the metal terminal and not the insulation.
- When testing the secondary resistance, hold the probe firmly against the terminal to ensure a good connection.
- If you get an open circuit reading (infinite resistance), the ignition coil is definitely faulty.
- If you get a low resistance reading (less than 0.5 ohms), the ignition coil may be shorted and should be replaced.
- If you get a high resistance reading (more than 15,000 ohms), the ignition coil may be weak and should be replaced.
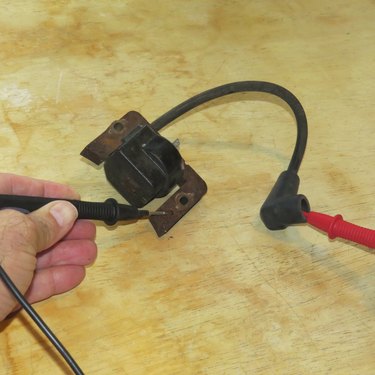
Image: www.hunker.com
How To Check Ignition Coil With Ohm Meter
Conclusion
Checking an ignition coil with an ohm meter is a simple and effective way to troubleshoot potential problems. By following the steps outlined above, you can quickly and easily determine if your ignition coil is functioning properly. If you discover that your ignition coil is faulty, it’s important to replace it as soon as possible to avoid further problems. With a new ignition coil, your engine will run smoother, start easier, and perform at its best.


