Prepare yourself to embark on an exciting artistic journey as we delve into the captivating world of drawing one of the most beloved superheroes – the extraordinary Spider-Man. Whether you’re an aspiring young artist or an experienced drawer yearning to refine your skills, this comprehensive guide will provide you with the essential steps and techniques to masterfully recreate the iconic Spider-Man character. Let’s swing into action and explore the artistic techniques that will bring Spider-Man to life on paper!

Image: www.vrogue.co
Step 1: Crafting the Head and Body
-
Creating the Base: Begin by lightly sketching a circle for the head and a slightly larger oval underneath it to represent the body. Connect the head and body with two curved lines, forming the neck.
-
Defining the Arms and Legs: Next, sketch two curved lines extending from the body oval for the legs. Similarly, draw two shorter curved lines for the arms, extending from the sides of the head circle.
-
Adding Initial Details: Outline the basic shape of Spider-Man’s mask over the head circle. Sketch a small line in the center of the face for the nose and two dots for the eyes.
Step 2: Shaping the Muscles and Suit
-
Building the Muscles: Define Spider-Man’s muscular physique by adding curved lines to represent the biceps, triceps, and abdominal muscles.
-
Refining the Suit’s Details: Draw a curved line across the chest to create the spider emblem. Add short lines around the emblem for the web design. Outline the shape of the costume with sharp lines, incorporating the famous web patterns.
-
Creating the Web-Shooters: On the forearms, draw small ovals to represent the web-shooters. Extend lines from the web-shooters, resembling the web strands.
Step 3: Designing the Spider-Man Pose
-
Dynamic Posing: Decide on the desired pose for Spider-Man, whether it’s web-slinging, wall-crawling, or capturing criminals. Sketch guidelines to help you capture the body’s movement and proportions.
-
Adding Hands and Feet: Draw Spider-Man’s hands and feet according to the pose, paying attention to the articulation and webbed design of his gloves and boots.
-
Enhance the Suit’s Texture: Add fine lines and shading to Spider-Man’s suit to enhance its texture and create a more realistic appearance.
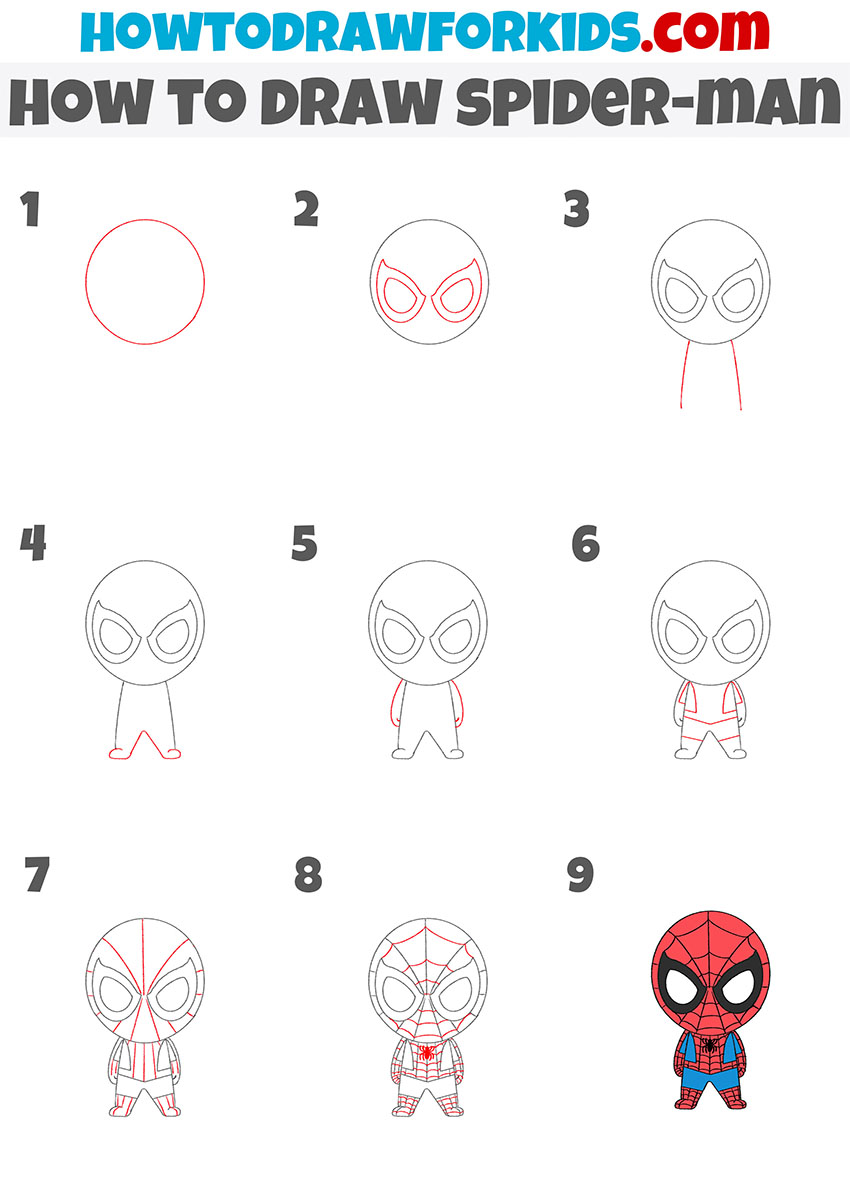
Image: ar.inspiredpencil.com
Step 4: Finalizing the Drawing
-
Refining the Lines: Carefully go over the sketch and refine the lines, erasing unnecessary guidelines. Thicken the lines to define the contours and highlight the muscle structure.
-
Adding Details: Draw the intricate details of Spider-Man’s eyes, teeth, and costume patterns. Add shadows and highlights to create depth and dimension.
-
Erasing and Inking: Once you’re satisfied with the drawing, erase any remaining guidelines. Ink the outlines with a pen or marker for a more permanent and polished look.
How To Draw Spiderman Step By Step Easy
https://youtube.com/watch?v=MwgT8z_iJi0
Step 5: Color and Finishing Touches
-
Choosing a Color Scheme: Select the classic Spider-Man color scheme of red, blue, and black. You can also customize the colors to your preference for a more unique interpretation.
-
Coloring the Suit: Begin by filling in the blue areas, such as the chest, shoulders, and legs. Then, add the red color to the remaining suit areas, including the mask, arms, and lower body.
-
Adding Shadows and Highlights: Use a darker shade of blue for shadows and a lighter shade for highlights on the suit to create a sense of depth. Pay attention to the light source to enhance the overall effect.
-
Web Patterning: Create the iconic web pattern by drawing thin white lines over the red areas of the suit. Vary the thickness and angles of the lines to give them a dynamic look.
-
Final Touches: Add finishing details such as highlights in Spider-Man’s eyes and any additional web strands to further enhance the drawing’s realism. Congratulations! You have now successfully drawn Spider-Man, the beloved web-slingingヒーロー. Display your masterpiece with pride, and continue practicing to hone your artistic skills even further. Remember, drawing is a journey of exploration and refinement, so keep practicing and experimenting to create your own unique style. Enjoy the rewarding experience of bringing Spider-Man to life on paper!


