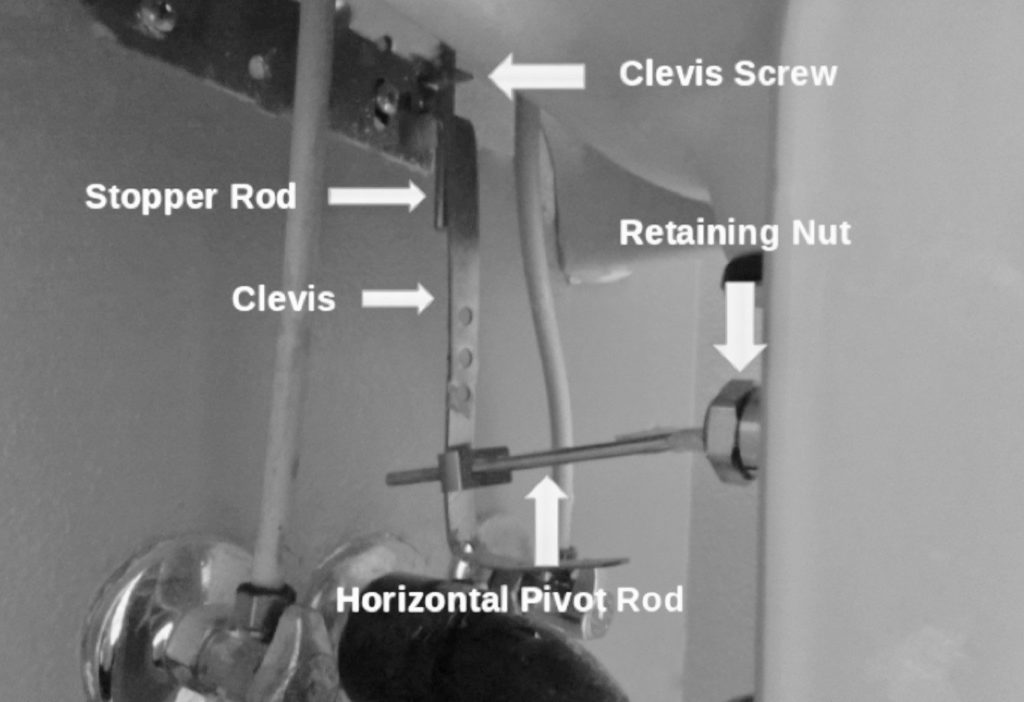
Are you tired of dealing with a faulty sink stopper that keeps slipping or causing clogs? If so, it’s time to take matters into your own hands and learn how to replace a bathroom sink stopper like a pro. This detailed guide will empower you with all the knowledge and steps you need to successfully replace your sink stopper, even if you’re a complete beginner. Say goodbye to leaky stoppers and hello to a revitalized, smooth-functioning sink.

Image: agentisplumbing.com
Understanding Bathroom Sink Stoppers
A bathroom sink stopper is a crucial component responsible for sealing the drain opening and preventing water from flowing into the pipes. Over time, sink stoppers can become worn, damaged, or clogged, leading to leaks, slow drainage, and other inconveniences. Replacing a sink stopper is a straightforward task that requires minimal tools and can be accomplished in just a few minutes.
Step-by-Step Guide to Replacing a Bathroom Sink Stopper
- Gather Your Tools: To replace your bathroom sink stopper, you’ll need a pair of adjustable pliers, a screwdriver (Phillips or flathead, depending on your stopper type), a rag, and a new sink stopper.
- Turn Off the Water Supply: Before you start working, turn off the water supply to your sink. This will prevent any accidental flooding while you’re removing the old stopper.
- Remove the Stopper Cap: If your sink stopper has a removable cap, use your pliers to gently twist it counterclockwise and pull it up.
- Unscrew the Stopper Body: Once the cap is removed, use your pliers or screwdriver to loosen and remove the stopper body. It may be necessary to apply some moderate force if the stopper is stuck.
- Clean the Drain Hole: Take a moment to clean any debris or residue from the drain hole. This will ensure that your new stopper fits snugly and seals properly.
- Insert the New Stopper Body: Apply a thin layer of plumber’s putty around the base of the new stopper body. Carefully insert the stopper into the drain hole and tighten it by hand.
- Reattach the Stopper Cap: Slide the stopper cap back onto the body and tighten it with your pliers. Again, apply gentle pressure to avoid overtightening.
- Test the Stopper: Turn the water supply back on and fill your sink with water. Check if the stopper is sealing properly by pressing down on it and ensuring that no water leaks out.
Expert Tips and Insights
- Choosing the Right Stopper: When selecting a new sink stopper, consider the material, size, and style that best suits your bathroom décor and sink type.
- Preventing Leaks: To minimize the risk of leaks, ensure that the stopper is properly aligned and tightened. You can also apply a small amount of silicone sealant around the base of the stopper for added protection.
- Regular Maintenance: Regularly cleaning your sink and stopper will prevent them from becoming clogged or damaged. Use a mild cleaning solution and a soft cloth to wipe down the surfaces regularly.

Image: dreamy-person.blogspot.com
How To Replace A Bathroom Sink Stopper
Conclusion
Replacing a bathroom sink stopper is an accessible and rewarding task that everyone can tackle. By following the steps outlined in this guide and incorporating the expert tips, you’ll have a functional and leak-free sink stopper in no time. Remember, home improvement tasks don’t have to be daunting; with the right knowledge and a positive attitude, you can accomplish anything!


/GettyImages-1303637-two-way-mirror-57126b585f9b588cc2ed8a7b-5b8ef296c9e77c0050809a9a.jpg?w=740&resize=740,414&ssl=1)


