Delving into the World of VCRs: A Blast from the Past
In an era where streaming services reign supreme, the humble videocassette recorder (VCR) may seem like a relic of the past. However, for those of us with a vast collection of cherished memories stored on videotapes, hooking up a VCR to a modern television can be an exercise in nostalgia and entertainment. Here’s a comprehensive guide to help you navigate the process seamlessly:

Image: columbiaisa.50webs.com
Understanding the VCR and Its Connections
A VCR is an electronic device that can record and play video and audio from videocassettes. To connect it to a TV, you’ll need the following cables:
- Composite video cable: This cable has three RCA connectors (yellow for video, white for left audio, and red for right audio).
- S-video cable: This cable has a single S-video connector (usually black) and two RCA connectors for audio.
- RF cable: This cable has a single RF connector (a round, coaxial type of connector).
Step-by-Step Hookup Instructions
Once you have the necessary cables, follow these steps to connect your VCR to your TV:
- Select the input source: On your TV, switch the input source to the port where you’ll connect the VCR (usually labeled “Video” or “AUX”).
- Connect the video cable: Connect one end of the composite, S-video, or RF cable to the corresponding output port on the VCR (usually labeled “Video Out” or “S-Video Out”).
- Connect the audio cables: Connect the white and red RCA connectors to the corresponding audio output ports (usually labeled “Audio Out” or “L/R Out”) on the VCR.
- Connect the RF cable (optional): If your VCR has an RF output and your TV has an RF input, you can use the RF cable to connect them. This is a convenient option if you don’t have a composite or S-video input available.
- Power on and tune: Once all the cables are connected, power on the VCR and the TV. Use the channel tuner on the TV to tune to the correct channel (usually channel 3 or 4) to display the VCR’s output.
Tips and Expert Advice
Here are a few additional tips to ensure a smooth and optimal experience:
- Choose the right cables: For the best picture and sound quality, use a composite or S-video cable instead of an RF cable.
- Use high-quality cables: Cheap cables can introduce interference and signal loss.
- Check the VCR’s settings: Make sure the VCR’s output settings are set appropriately for the type of cable you’re using.
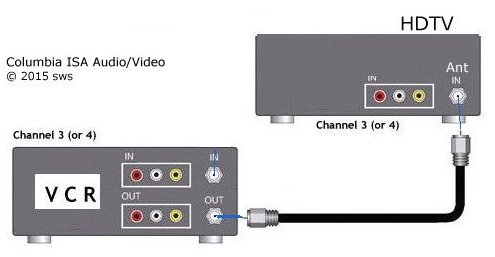
Image: blog.dnevnik.hr
FAQs
- Q: Why can’t I see the VCR’s output on my TV?
A: Ensure that the VCR is turned on, the correct input source is selected on the TV, and all the cables are properly connected.
- Q: The picture quality from my VCR is poor. How can I improve it?
A: Try using a different video cable (composite or S-video) or check the VCR’s settings to optimize the video output.
- Q: Can I transfer VHS tapes to a digital format?
A: Yes, you can use a VCR with a digital output or a video capture device to convert VHS tapes to digital files.
How To Hook A Vcr Up To A Tv
Conclusion
With a little bit of effort, you can now relive your favorite VHS memories on a modern TV. By following the step-by-step instructions and incorporating the tips provided, you can enjoy seamless playback and savor the nostalgia of a bygone era. If you find this guide helpful, please share your thoughts and experiences below. Do you still have a VCR collection that you enjoy watching?


/GettyImages-1303637-two-way-mirror-57126b585f9b588cc2ed8a7b-5b8ef296c9e77c0050809a9a.jpg?w=740&resize=740,414&ssl=1 "Unveiling the Illusion – A Comprehensive Guide to Detecting Two-Way Mirrors")


