Unleash Your Inner Roman
Prepare for a night of revelry and historical immersion as we delve into the art of tying a toga with a sheet. From the vast sands of ancient Rome to the bustling streets of modern-day cities, this iconic garment has effortlessly exuded sophistication and grandeur.

Image: www.pinterest.com
Don’t let the thought of intricate folds and complicated knots intimidate you. With our comprehensive guide, you’ll master the secrets of togas in no time, transforming a mundane sheet into a symbol of power and elegance.
The Essential Elements: Cinching Up with a Belt
Before embarking on our toga-tying adventure, gather a few essential items: a large sheet, preferably cotton or linen, a belt or sash, and a fibula (a Roman clasp or safety pin). A mirror is also helpful for checking your handiwork.
1. Prepare the Belt and Fibula: Begin by fastening your belt around your waist, ensuring it sits comfortably on your hips. Secure the ends of the belt with the fibula. This belt will not only keep your toga in place but also accentuate your waistline.
Drape and Fold: Creating the Classic Drape
2. Form the Initial Drape: Spread out your sheet on a flat surface. Stand with your feet shoulder-width apart and place the center of the long edge of the sheet on your left shoulder, allowing it to drape over your back. Bring the left end over your right shoulder and wrap it across your chest.
3. Adjust and Pleat: Holding the sheet securely, raise your right arm and pull the fabric taut. This will create a long loop that you can wrap around your waist, overlapping the left side.
4. Fold and Secure: With your right hand, fold up the lower edge of the drape, pleating it tightly. Secure the pleats with your fibula to create a graceful cascade.
Accentuate and Accessorize: Enhancing Your Toga
5. Left Shoulder Drape: Bring the remaining fabric from your left shoulder across your chest, forming a loose fold. Pin it in place over your right shoulder with the fibula.
6. Armhole Adjustments: To create a more defined look, tuck any excess fabric under your armpits and secure it with safety pins. This will accentuate your arms and prevent the toga from slipping off.
7. Accessorize with Footwear and Sandals: Enhance your toga with sandals or leather boots. A pair of elegant sandals with straps will complement the flowy drape of the toga.
8. Headwear and Jewelry: For a truly Roman-inspired look, consider adding a laurel wreath, headband, or brooch. These accessories will add a touch of authenticity to your attire.
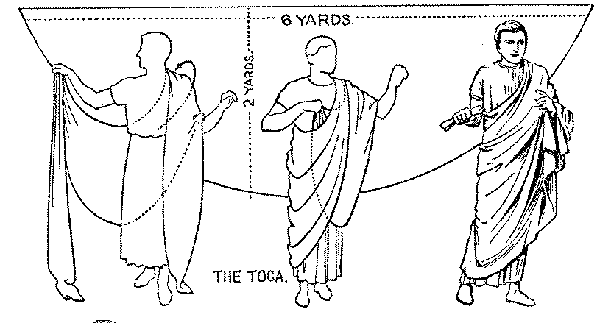
Image: www.howtomakeatoga.info
Expert Advice: Enhancing Your Technique
**Tip 1: Practice Makes Perfect:** Don’t expect to master toga-tying overnight. With each attempt, you’ll become more comfortable and create a better-looking toga.
**Tip 2: Use Different Fabric Weights:** Experiment with sheets of various weights and textures. Heavier linen or cotton will create a more structured and formal look, while lightweight fabrics will be more fluid and comfortable.
**Tip 3: Seek Expert Advice:** If you encounter difficulties or have specific tailoring questions, consider reaching out to a seamstress or experienced costumer. They can provide valuable guidance and ensure a perfect fit.
Frequently Asked Questions: Clarifying Common Queries
Q: What is the ideal sheet size for a toga?
A: The dimensions of your sheet will depend on your height and desired fullness. A sheet that is at least 8 feet long and 6 feet wide is a good starting point.
Q: Can I use a patterned or colored sheet?
A: Yes, patterned or colored sheets can create a unique and eye-catching toga. However, traditional Roman togas were typically white or off-white.
Q: How do I wash a toga made from a sheet?
A: Machine wash your toga on a gentle cycle with cold water and mild detergent. Avoid using bleach or harsh detergents, as these can damage the fabric.
How To Tie A Toga With A Sheet
Conclusion: A Timeless Garment with Endless Possibilities
Mastering the art of tying a toga with a sheet opens up a world of possibilities for historical reenactments, plays, and costume parties. Whether you’re channeling the glory of ancient Rome or embracing the whimsical spirit of a toga party, you’ll turn heads wherever you go.
Embark on this creative journey today and discover the timeless elegance of the toga. Experience the pride and satisfaction of creating a garment with your own hands, and let the allure of history envelop you from the moment you drape it over your body.
Are you ready to embark on this sartorial exploration and elevate your next toga-wearing occasion?


/GettyImages-1303637-two-way-mirror-57126b585f9b588cc2ed8a7b-5b8ef296c9e77c0050809a9a.jpg?w=740&resize=740,414&ssl=1 "Unveiling the Illusion – A Comprehensive Guide to Detecting Two-Way Mirrors")


