Step into Bikini Bottom and Bake a Delightful SpongeBob SquarePants Cake

Image: www.littlebcakes.com
Prepare yourself for a sweet and unforgettable baking adventure as we guide you through the enchanting process of creating a whimsical SpongeBob SquarePants cake. This beloved character from the underwater world has captivated hearts across generations, and now you can bring him to life in edible form.
With its cheerful yellow exterior, innocent smile, and quirky demeanor, SpongeBob SquarePants has become an icon of joy and laughter. It’s time to bask in the bubbly magic of his world and create a masterpiece that will delight both young and old.
The Art of Cake Crafting: A Step-by-Step Guide
Embark on this culinary journey with confidence as we meticulously guide you through each stage of the SpongeBob cake creation. From gathering ingredients to decorating with precision, we’ll equip you with the knowledge and techniques to impress any aspiring pastry chef.
- Lay the Foundation: A Sponge-Worthy Cake Base
The heart of any cake lies in its fluffy, moist interior. For our SpongeBob masterpiece, we’ll rely on a classic sponge cake base. Combine sifted flour, sugar, baking powder, and salt to create a light and airy foundation. Whisk together eggs and milk, then gradually add them to the dry ingredients until a smooth batter forms. Pour the batter into a greased and floured 9-inch round cake pan and bake until golden brown.
- Carving the Iconic Sponge: Shape into a Square
Once your cake has cooled, it’s time to transform it into the inimitable SpongeBob silhouette. Carefully trim the cake into a rough square shape, using a serrated knife for a clean cut. Then, with a bit of patience and precision, carve out the sharp angles to achieve SpongeBob’s recognizable boxy form.
- Smooth Sailing: An Even Frosting
In a separate bowl, whip up your frosting of choice. We recommend a classic buttercream for its rich, velvety texture. Spread a thin layer of frosting over the entire cake to create a smooth surface for the vibrant details that await.
- Aquatic Ambiance: Tint the Frosty Depths
Now, it’s time to dive into the colorful depths of Bikini Bottom. Divide your frosting into several bowls and tint them in a kaleidoscope of hues: a vibrant yellow for SpongeBob’s iconic body, a deep blue for his trousers, and a crisp white for his shirt collar.
- Detailing Delights: Bringing SpongeBob to Life
With an artist’s touch, use your tinted frosting to carefully delineate SpongeBob’s features. Pipe a curvy line for his infectious smile, two small circles for his buck teeth, and three perfect circles for the iconic holes in his body. Don’t forget the tiny details like his bright-red tie and blushing cheeks, adding a touch of whimsy to his lovable persona.
Expert Insights: Tips from the Pastry Masters
To elevate your SpongeBob cake from ordinary to extraordinary, heed these sage tips from master bakers:
- Signature Squareness: For a perfectly square SpongeBob, use a ruler or straight edge as a guide when trimming the cake.
- Smooth Canvas: Before frosting, ensure your cake has cooled completely to prevent melting and a bumpy surface.
- Candy Enhancements: Add a sweet touch by decorating with colorful candy pieces, such as gummy bears for buttons and chocolate chips for freckles.
The Final Flourish: Sharing the Joy
Once your SpongeBob masterpiece is complete, capture its vibrant beauty and share it with the world. Upload a photo of your delightful creation online or gather your loved ones for a feast filled with sweet laughter and happy memories. The joy of baking lies not only in the final product but also in the moments spent spreading happiness through culinary delights.
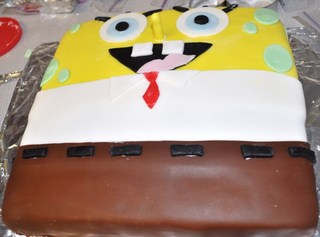
Image: www.perfect-parties.com
How To Make A Sponge Bob Cake


/GettyImages-1303637-two-way-mirror-57126b585f9b588cc2ed8a7b-5b8ef296c9e77c0050809a9a.jpg?w=740&resize=740,414&ssl=1 "Unveiling the Illusion – A Comprehensive Guide to Detecting Two-Way Mirrors")


