In the realm of digital communication, our smartphones have become an indispensable tool, housing a wealth of personal information, including our cherished phone numbers. Whether it’s a contact you no longer wish to communicate with or an outdated number, the ability to delete a phone number from iCloud is paramount for maintaining organization and privacy. If you find yourself grappling with this task, fear not! This in-depth guide will provide you with a comprehensive, step-by-step walkthrough, ensuring you can effortlessly remove unwanted phone numbers from your iCloud account.

Image: support.discord.com
Unraveling the Mysteries of iCloud and Your Phone’s Contact List
Before delving into the nitty-gritty of deleting a phone number from iCloud, let’s shed some light on the relationship between iCloud and your device’s contact list. iCloud, a cloud-based service offered by Apple, allows you to seamlessly sync your contacts, ensuring they remain accessible across all your Apple devices. This implies that any changes you make to your contacts on one device, such as deleting a phone number, will be automatically reflected on all your other iCloud-connected devices.
Step 1: Dive into Settings
To initiate the deletion process, embark on a journey into your iPhone’s “Settings” application. Once there, navigate through the various options until you stumble upon “Contacts,” a haven for managing all your phone numbers.
Step 2: Pinpoint the Contact
Within the “Contacts” section, you’ll be greeted by a comprehensive list showcasing all the phone numbers stored on your device. Diligently scroll through the list until you locate the number you wish to banish from your digital realm. Once found, click on the contact to reveal additional options.
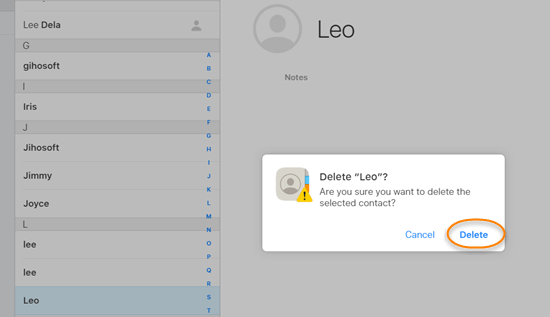
Image: www.jihosoft.com
Step 3: Unchain the Delete Button
Once you’ve identified the undesirable contact, the moment of deletion draws near. Tap on the “Edit” option located in the top right corner of the screen. This action will unveil various contact details, including the phone number you seek to eradicate. Position your cursor directly in front of the phone number, and to your delight, you’ll notice a red “Delete” button appear conveniently next to it.
Step 4: Confirm Your Resolution
As the final act of this digital decluttering ritual, you’ll be prompted with a confirmation query, seeking your final nod of approval before proceeding with the deletion. With unwavering resolve, tap on the “Delete” button once more, and behold, the phone number will vanish from your contact list, forever consigned to the annals of digital history.
How To Delete A Phone Number From Icloud
Conclusion: A Phone Number-Free Future
Congratulations! You have successfully navigated the uncharted territories of deleting a phone number from iCloud. By following these simple steps, you have not only decluttered your contact list but also regained control over your digital footprint. Remember, this newfound knowledge empowers you to manage your contacts with ease, ensuring your iCloud account remains organized and free from unwanted intrusions. Should you encounter any difficulties or have additional queries, please don’t hesitate to seek further assistance or explore the vast resources available online.
Call to Action: Share your experiences or any additional tips on deleting phone numbers from iCloud in the comments section below. Together, let’s empower each other with digital know-how and foster a community of connected and organized individuals.


/GettyImages-1303637-two-way-mirror-57126b585f9b588cc2ed8a7b-5b8ef296c9e77c0050809a9a.jpg?w=740&resize=740,414&ssl=1 "Unveiling the Illusion – A Comprehensive Guide to Detecting Two-Way Mirrors")


