Tired of your inbox overflowing with countless emails, making it challenging to find what you need? Fear not! Gmail, the popular email service, offers a solution: filters. These powerful tools can automatically sort incoming emails into specific folders, keeping your inbox organized and your sanity intact. In this comprehensive guide, we’ll delve into the world of Gmail filters, empowering you to declutter your digital life and regain control over your inbox. Read on to discover the art of email filtering and unlock the secret to a well-managed inbox.

Image: deepdecide.com
1. Unmasking the Magic of Gmail Filters
Think of Gmail filters as your personal assistants, diligently screening your incoming emails and dispatching them to their designated folders. By setting up filters, you delegate the task of sorting emails to Gmail, freeing up your time for more important matters. But what makes filters so remarkable? Here are a few key advantages:
- Automated Organization: Wave goodbye to manually moving emails to folders. Filters work tirelessly in the background, ensuring emails land in the right spot without you lifting a finger.
- Streamlined Workflow: With related emails neatly organized, you can focus your attention where it’s needed. No more distractions from irrelevant emails, just a well-tailored inbox that supports your workflow.
- Enhanced Productivity: Less time spent searching for specific emails translates to more time for the tasks that truly matter. Filters save you precious minutes every day, boosting your productivity and overall efficiency.
2. Crafting the Perfect Gmail Filter: A Step-by-Step Guide
Now that you’ve witnessed the wonders of Gmail filters, it’s time to learn how to harness their power. Follow these simple steps and witness your inbox transform from a chaotic mess into a haven of organization:
I. Accessing the Gmail Filter Menu
Navigate to the inbox of your Gmail account. Click the gear icon in the top-right corner and select “Settings.” Under the “Filters and Blocked Addresses” tab, click on “Create a new filter.”
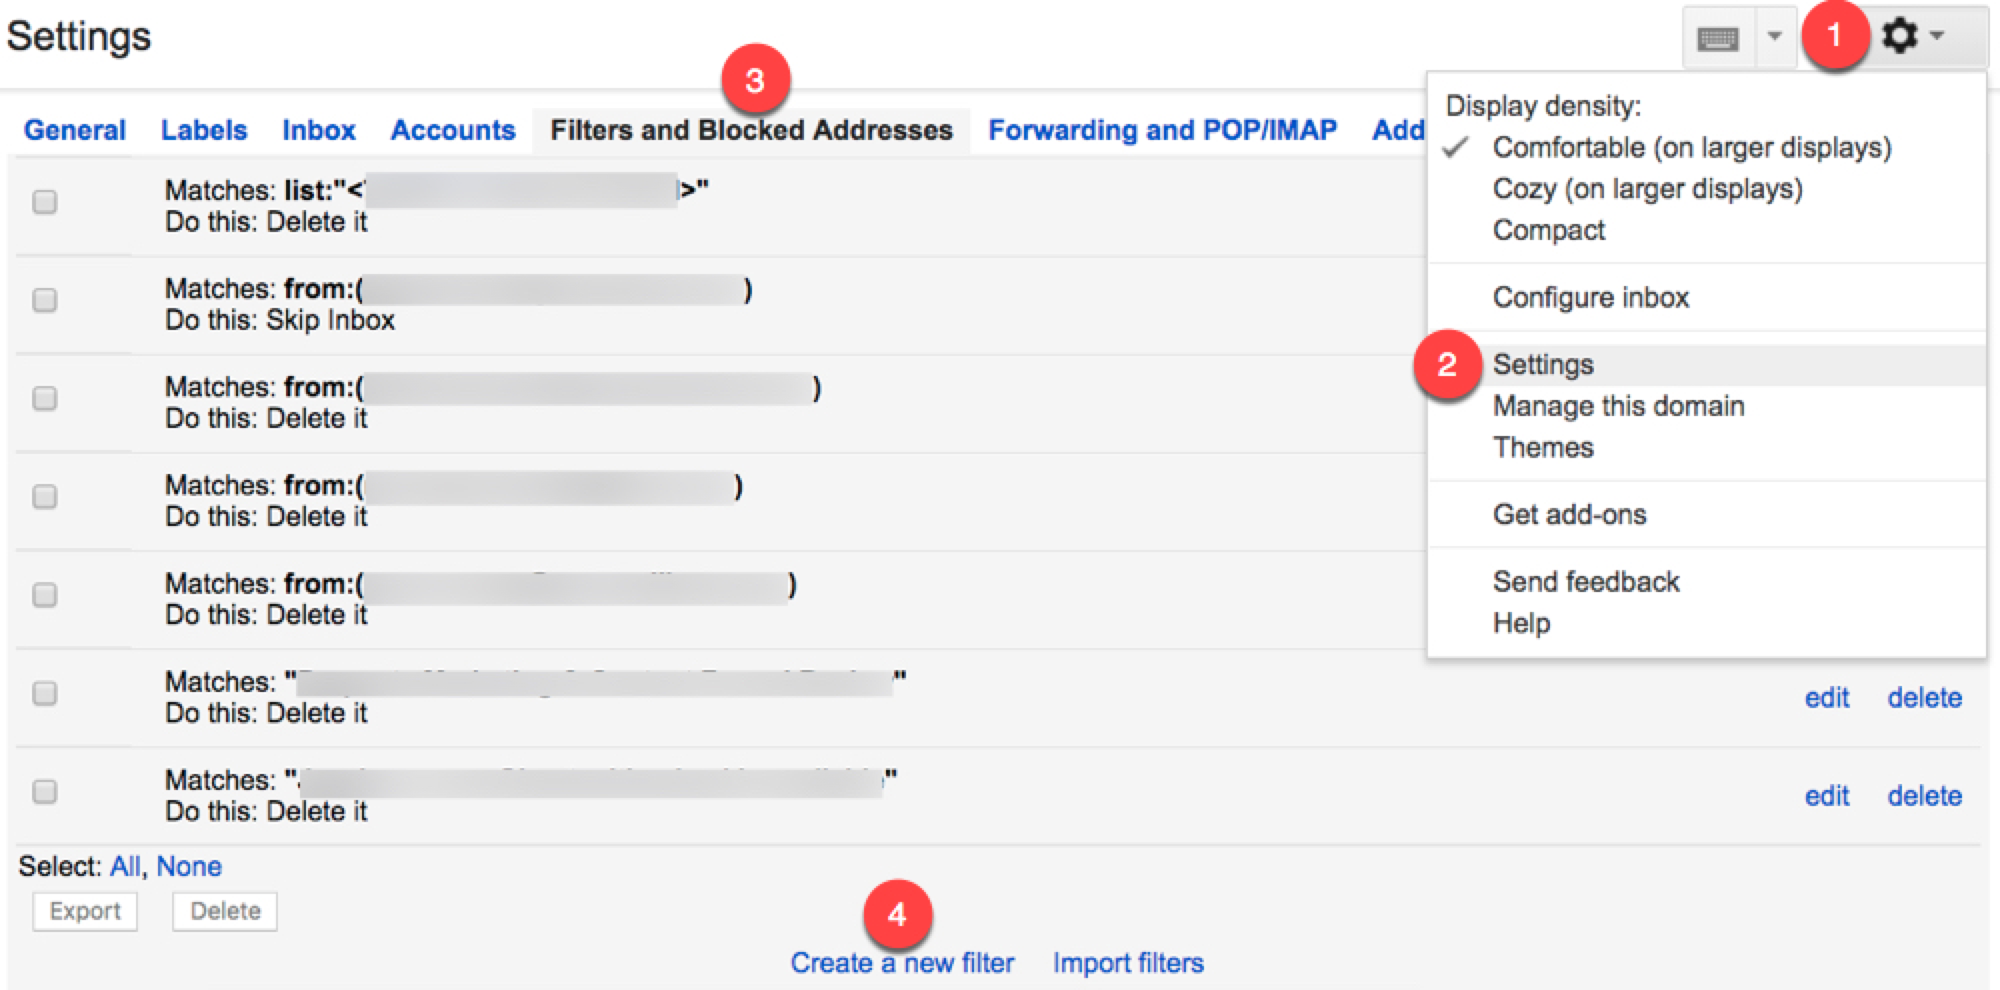
Image: vincentsavoie.blogspot.com
II. Defining the Filter Criteria
This is the heart of your filter, where you specify the conditions that trigger it. Choose from a wide range of criteria, such as sender’s email address, subject line, keywords in the body, attachment presence, and more. Craft your criteria carefully to ensure it captures only the desired emails.
III. Specifying the Filter Action
Once you’ve defined the filter criteria, it’s time to decide what action Gmail should take on the matching emails. Choose from options like forwarding to another email address, deleting the emails, marking them as read/unread, applying labels, or even skipping the inbox altogether.
IV. Naming and Saving the Filter
Give your filter a descriptive name for easy identification. Once you’re happy with the criteria and action, hit “Create filter.” That’s it! Gmail will now automatically apply the filter, keeping your inbox organized and clutter-free.
V. Tips for Effective Gmail Filters
To maximize the effectiveness of your filters, follow these tips:
- Use Specific Criteria: Avoid broad criteria that might accidentally match unwanted emails. Use specific keywords, email addresses, or other criteria to narrow down the filter’s scope.
- Test and Refine: After creating a filter, monitor its performance and make adjustments as needed. Ensure it’s consistently sorting emails correctly without any false positives or negatives.
- Use Multiple Filters: Create multiple filters for different types of emails. This allows you to organize your inbox into various categories, making it even easier to find what you’re looking for.
- Incorporate Labels: Assign labels to filtered emails for further organization. Labels are like subfolders within your inbox, helping you categorize emails based on projects, clients, or any other custom criteria.
- Periodic Maintenance: Over time, your email needs may change. Periodically review and update your filters to ensure they continue to meet your organizational requirements.
3. Advanced Gmail Filtering Techniques for Power Users
Ready to take your Gmail filtering skills to the next level? Here are some advanced techniques for power users:
I. Using Wildcard Characters
Enhance your filter criteria by leveraging wildcard characters. The asterisk (*) matches any sequence of characters, while the question mark (?) matches any single character. These wildcards allow for more flexible and comprehensive filtering.
II. Combining Multiple Search Operators
Don’t limit yourself to a single filter criterion. Combine multiple search operators using AND, OR, or NOT to create highly customized filters that target specific emails with precision.
III. Regex Expressions for Complex Filtering
If you’re comfortable with regular expressions, you can harness their power for advanced email filtering. Regex patterns provide immense flexibility, allowing you to define complex criteria and match intricate patterns within email content.
Gmail How To Filter Emails To A Folder
IV. Automating Filter Creation with Apps
Take advantage of third-party apps that streamline the filter creation process. These apps offer pre-defined templates and intuitive interfaces, making it easier to create complex filters with just a few clicks.
With these advanced filtering techniques, you can elevate your email organization to new heights, transforming your inbox into a well-oiled machine that effortlessly sorts and categorizes your incoming emails.


/GettyImages-1303637-two-way-mirror-57126b585f9b588cc2ed8a7b-5b8ef296c9e77c0050809a9a.jpg?w=740&resize=740,414&ssl=1 "Unveiling the Illusion – A Comprehensive Guide to Detecting Two-Way Mirrors")


