In this era of digital tapestry, we capture life’s precious moments in the form of photographs – tangible fragments of our shared experiences. But what happens when we want to relive these memories beyond the confines of our digital screens? The humble flash drive, a discreet yet powerful storage device, offers a seamless and portable solution.

Image: www.youtube.com
Let’s embark on an emotional journey as we delve into the simple steps involved in transferring your treasured photographs onto a flash drive, ensuring their preservation and accessibility for years to come.
Step 1: The Power of Preparation
Before we set sail into the digital realm, it’s crucial to prepare your vessel – your computer or laptop – and gather the necessary tools:
-
Acquire a reliable flash drive: Invest in a flash drive with sufficient storage capacity to accommodate your precious images. Remember, you’re entrusting your memories to this digital repository, so choose wisely.
-
Ensure sufficient power: Sometimes, the journey can be longer than anticipated. Ensure your computer or laptop has ample battery life or is connected to a power source to avoid any interruptions.
Step 2: Navigating the Digital Treasure
With our tools at hand, let’s dive into the heart of the transfer process:
-
Locate your digital haven: Open the folder or program where your photographs reside, be it a dedicated photo management app or a simple desktop folder.
-
Select your cherished memories: Carefully select the images you wish to transfer to your flash drive. These are the moments that evoke emotions, stories, and connections that you want to preserve.
-
Unleash the power of copy and paste: Right-click (or press Command + C on Mac) on the selected images to copy them onto your computer’s digital clipboard.
Step 3: Embracing the Flash Drive
Now that your precious images are temporarily stored on your computer’s clipboard, it’s time to connect your flash drive:
-
Connect your digital bridge: Insert the flash drive into an available USB port on your computer. The drive will typically appear as an external storage device on your computer’s desktop.
-
Open the gates to your new digital abode: Double-click on the flash drive icon to open its contents in a new window or tab.
-
Welcome your memories into their new home: Right-click (or press Command + V on Mac) within the flash drive window to paste the copied images from your computer’s clipboard.
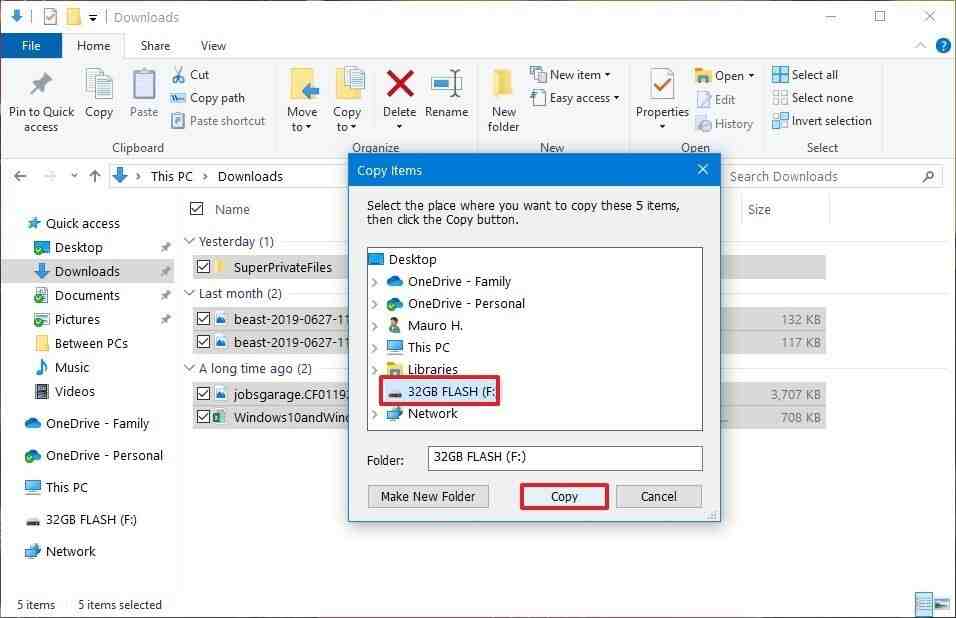
Image: reputation-war.fr
Step 4: The Triumphant Completion
As the last byte of data flows into your flash drive, a sense of accomplishment washes over you. You’ve successfully transferred your cherished memories to a secure and portable haven:
-
Admire your digital sanctuary: While it may lack the tactile nature of a physical photo album, the flash drive holds within it a boundless collection of your most treasured moments.
-
Disconnect and store with care: Safely remove the flash drive from your computer to prevent data loss. Store it in a cool and dry place, away from direct sunlight or extreme temperatures.
How Do I Transfer Pictures To A Flash Drive
Conclusion
Transferring your cherished photographs onto a flash drive is an empowering journey that preserves your memories for years to come. By embracing these simple steps, you’ve created a digital sanctuary where your most precious moments can be relived and shared with loved ones, wherever life’s adventures may lead.
Remember, the flash drive is not merely a storage device; it’s a keeper of your treasured past and a bridge to your cherished future. Embrace the power of technology to safeguard your memories and embark on a journey of preserving your emotional heritage.


/GettyImages-1303637-two-way-mirror-57126b585f9b588cc2ed8a7b-5b8ef296c9e77c0050809a9a.jpg?w=740&resize=740,414&ssl=1 "Unveiling the Illusion – A Comprehensive Guide to Detecting Two-Way Mirrors")


